Sunday, 6 May 2018

More Raging Heroes resin

After I had done the initial painting on my previous Raging Heroes resin, I took the opportunity to get some more.  I did wonder if I really wanted to mess with resin and mould release agent again, but decided to go ahead. Thankfully, the new batch came with a guide on how to clear and prepare them, so I'm hoping things will be easier this time around.  


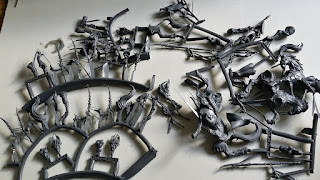
Packs of horses and riders and 10 foot, plus a couple of bonus figures.  


And spread out before lying for a while and then heading for a soapy bath (per the instructions).   


Another batch of figures I picked up had been assembled and undercoated.  However, I think on a couple of models the previous owner may have had the same issues with the mould release agent as I had, as the paint is peeling in a couple of places. It's not much and will be easy to fix. 


I'll see how I get on assembling and starting painting these. The assembling stage may be a bit of a chore as some of the bits seem fragile, but I'm looking forward to painting them. More later ... 

Tuesday, 24 April 2018

Tanks. You're welcome!

I got the 28mm tanks finished.  And thanks to the Marx Brothers for the title of the post.  Here's the photos. 

The armoured car got it's three colour finish. For a long time I thought I should leave it as just the dark yellow and green, but finally resolved to make it like the others. 


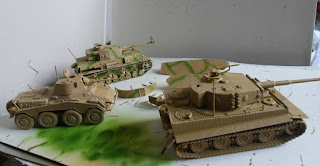
A long shot. Basically most of the painting is done.   


A close view of curly, larry and moe, before they go to their vehicles.  


With transfers (decals) attached. They are a bit bright, but I left them as is. I also did very minimal weathering; not more than a dusting of earth on tyres and tracks as I'm not a fan of heavy weathering. 


A front view of the 3 stooges or 3 amigos in their vehicles. In any vehicles I do, I always try to have a figure to give them a personal touch. 


And a view of the Panzer IV with the skirts attached with blu-tak. I decided to leave the skirts loose to allow for representing different models in games.  (Apologies for the slightly fuzzy, shaky hand photos here).  


And that's them. I reckoned that if the chap who agreed to buy the tanks, wanted heavier weathering he could easily apply some more, or glue the skirts on to the Pz IV.  

They were passed over to their new owner, a chap at our club, who kindly agreed to contribute something to a friends justgiving page, where she's baking cakes and raising money for cancer research.  In case you may be interested, her page is here; 
https://www.justgiving.com/fundraising/yvonne-peebles

More later, as I try to progress the 28mm Napoleonic Italians or the 15mm Seven Years War stuff, or another of the projects on the go ... 

Saturday, 14 April 2018

and another ongoing project ... tiger tiger

I got these 1/56 (28mm) German vehicles when I got my British for Bolt Action. I've decided to see if I can get them finished.

I bought these as a painting exercise, not for a game. I'd always intended to sell them once finished. I wanted to use the airbrush to try the two or three colour camouflage that was used from the mid-war onwards.  I also wanted to do the summer scheme, as I've always preferred it to the much darker green and brown used in the winter scheme.  

Anyhow, here's where they were several months ago. Only the Panzer IV had a test of the green camouflage. The colour is German light camouflage green. 


And all three with the green. My thoughts at this point were maybe I should have put thinner lines on the armoured car.  


Now with the red-brown added. I actually used a Vallejo air mud colour for this as I thought the panzer red-brown was still a bit dark.  I deliberately wanted to do much lighter tones on the vehicles, always thinking I could darken them later with paint or a wash if I wanted. The skirts on the Panzer IV are loose and may leave them that way, allowing for them to be used as different variants.  


Not too bad at that point. I did tidy up a couple of overspills. Then I went on to do the tracks with Vallejo dark rubber. This is a nice dark grey, and this and Vallejo back-grey have become two of favourites to use instead of black. I also did the crew figures; two in field grey and one in traditional black (... guess which tank gets the commander in black!). 


And finally a close-up of the crew. I tried to give the armoured car commander figure a yellow trim, to hint at someone clining on to their old cavalry traditions.  The chap in black was given pink trim and collar patches.


Overall, not too bad at this stage.  Next to be painted will be the various tools and cables on the vehicles, the exhausts and more on the treads and wheels.  

More later, 

Monday, 9 April 2018

The Italians job

Another project underway is 28mm Napoleonic figures for a skirmish game.  I'd like to have a crack at the Napoleonic variants of Lion Rampant or The Men Who Would Be Kings with these figures.  

I've decided to paint these as Italians, just as a something different from the usual French.  I've chosen the 3rd regiment with green facings and red collars. 

Here's progress so far.  Victrix figures and they have nice poses. White spray undercoat serves as a base colour for the uniforms. I've experimented with a black wash and grey for shading and I'll tidy all this later. 


And this is waiting in the wings.  Warlord figures are in much more basic poses than Victrix and not too fond of French infantry in greatcoats, but I'll see how I get on. If I don't like them, then I'll put them on ebay.  

Like many gamers or painters, the usual problem I have is too many projects that I'd like to do.  Hopefully I'll find the time to finish the Italians.  

More later. 

Saturday, 24 March 2018

The most recent project - Raging Heroes

This is another side project that's been bubbling under and I decided to try get beyond the bare metal / resin stage. I don't think these will make it to a game and are more just for the painting challenge.   

First, the metal figures. These figures are 32mm and intended as substitute figures for the warhamsters or other skirmish games. They are lovely figures and go under the name of sci-fi blood vestals! Whatever! Here they are, undercoated white. I did this batch of undercoating with the airbrush.  


Next, the first resin figures. These are the fantasy version, and are called Daughters of the Orphanage.

Now, these were my first resin figures are there was a little bit of swearing going on as I assembled them. The resin is quite brittle and care has to be taken cutting them from sprues. The detail is very good but the components like swords or ornaments are fragile and can break. Thankfully, superglue easily bonds the resin to repair breaks. I gave them a wash in warm soapy water and then sprayed the undercoat.   


Lastly, three more resin figures. These were as delicate and fragile as the previous batch, and more swearing ensued during assembly. But this was minor compared to language when washing the figures to remove the resin mould release agent. It took several washings, including one after my first spraying attempt when I had to remove the undercoat and wash them again. Finally I brushed on Fairy liquid from the bottle and let them soak before brushing and washing the figures again, and at last I got to a stage where they could be undercoated.  

And here's what they are now starting to look like. I airbrushed the skin with Vallejo Game Air elf flesh, then gave the figures a sort of wash lining of shadows and folds with a mixture of sepia and fleshtone washes. The result is OK so far. 


Now, in the past couple of years, I've become a convert to plastic figures, but my experience here with resin makes me doubt if I'll buy any more resin. Of course, I might be going about assembling resin figures all wrong. Maybe if I'd washed the resin figures thoroughly while still on the sprues it might have been easier.

More later.       


The Bolt Action British are done

The Bolt Action British are done. As much of January was spent assembling plastic Saxons, Vikings and Napoleonic figures, in February I decided to try and get something finished. The British for Bolt Action were nearly finished so I focussed on them. Here's the end result.


Some closer pictures. 


A final shot of the senior officer and nco with the red hackle, and the junior officer with the brolly. The red hackle had to be done; it's our local regiment. There's still a sense of respect, admiration and pride when I see the red hackle (though I suppose all regions of most countries  will have a pride in their own local regiments.)   

This force for Bolt Action has 3 sections of 10 infantry, a medium machine gun, artillery spotter, light mortar and PIAT. There's also a bren carrier and a Sherman and enough extra infantry to swop brens for rifles or add extra brens to sections. Rounding the force off and the officers and an RAF spotter.  

I also have to admit that the RAF spotter chap is not actually finished. But as he's unlikely to be used in a game, I'll leave him for now. I bought it because it's a nice figure. 

the mighty spraying

Here's some progress on Saxons, Vikings and Napoleonic plastics. 

The Saxons and Vikings are mounted on 25mm round plastic bases. They were given a bit of filler to disguise the cast-on base.  


Then the sand covering.  The Napoleonic figures were based on 20mm round bases for the line and 25mm round bases for the voltigeur skirmishers. 


Then I was waiting for a reasonably dry and warm day to get the spraying done. Not often we get those days in Scotland, but there was one, though it was more chilly than warm. Still, it was close enough and I got them undercoated. Maybe not much to look at, but it's an achievement. 


The Napoleonics will be painted as Italians, or some German states; chaps with white uniforms, so with a basic undercoat they are nearly done.   


And the great laugh is - all these figures now go back in boxes till I can get around to painting them. The Napoleonic figures might get done soon, but it may be a while before I can get round to doing the others.